Axure RP iPhone X and iPhone 8 device materials and prototype templates.
1. Introduction to interface elements and structure
As this template is designed based on the IOS system, the relevant interface elements and interaction methods are all based on IOS standards. At present, the mainstream mobile systems besides IOS and Android have some differences in design standards and interaction methods. However, most apps on the market do not compete for separate treatment of the two systems during design.
So if there is no demand for special beads, we usually only need to output one prototype solution, but we need to try to balance these two mainstream systems in the design process. Of course, if your product clearly needs to be designed according to the Android system specifications, you can also refer to this tutorial to design a set of Android prototype templates, and the relevant interaction methods can refer to the Android version's interaction guide specifications.
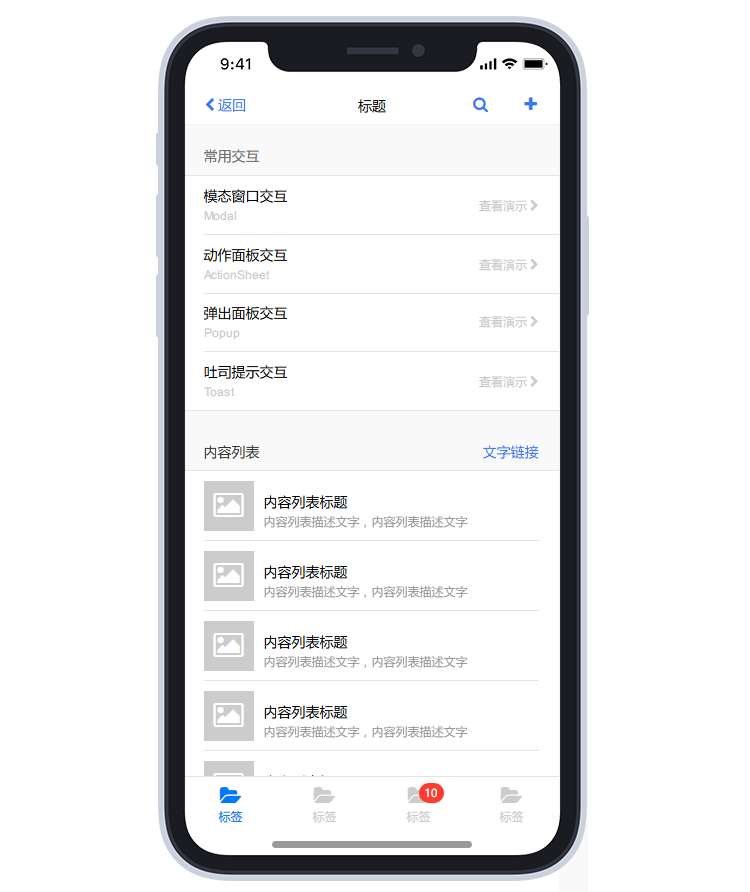
Before introducing the construction and usage of templates, it is necessary to give a brief introduction to the interface structure of the APP. Familiarity with the interface structure can facilitate our subsequent design. The interface of common apps mainly consists of the following elements or components:
Status Bar
The status bar displays key information about the device, including device model or network provider, network signal strength, battery usage, time, etc. In the special interface, you can hide the status bar or customize the background of the status bar as needed.
NavBar/Navigation Bar
The navigation bar is located above the app content area, below the system status bar, and provides navigation capabilities across a range of pages. The title of the current view can be displayed in the navigation bar. If the title is too lengthy and cannot be simplified, it can be left blank to avoid filling the navigation bar with too many elements. Text and icon controls can be added to the navigation bar, and the clickable area of the relevant controls needs to be larger than the visible size of the controls.
Body/Content Area
The content area can be customized according to needs, and common design forms include menu lists, icon lists, card lists, graphic and text combinations, etc.
TabBar/Label Bar
The tab bar is located at the bottom of the app, making it convenient for users to quickly switch between different functional modules. The tag bar is generally used as a first level classification for apps, with a quantity controlled between 3-5. Suggest using Badge as a prompt to let users know about any content updates.
Toolbar/Toolbars
The toolbar usually appears at the bottom of the view, providing users with relevant operable function buttons. For example, in the inbox bar of email applications, there are options such as delete, share, reply, etc.
Modal/Pop up Layer
The pop-up layer on mobile devices can be divided into several types based on the pop-up method, including modal windows, action panels, and pop-up panels. In practical use, the corresponding type can be selected based on the interaction mode of the interface.
Toast/Light Tips
A lightweight feedback prompt that can be used to display content that does not interrupt user operations, suitable for use in scenarios such as page transitions and data interaction. Display only one light prompt at a time, with 4-6 words for prompts with icons and no more than 14 words for prompts without icons.
TableView/List View
List view is a common interface element in mobile apps. Many applications use table views to display data lists to some extent. Common examples include the contact information list in iOS contact applications, as well as the list view used in Mail to display email addresses and messages. The list view can be used not only to display text data, but also to present image data.
2. Structured template construction
After introducing the interface structure of the APP, the next step is to explain the method of building the template. At the end of this tutorial, a file of the template that has already been created will be provided. You can download and refer to the introduction in this section to use it, or you can refer to the introduction to create your own prototype template.
When creating templates, it is necessary to use image materials of corresponding models and devices. You can find the corresponding material files through design sharing platforms such as Dribbble, and then perform some simple processing on the materials. The first step in the processing is to remove unnecessary elements and only retain the frame image of the device model. Additionally, it is necessary to adjust the size of the images. For example, when creating templates for mobile devices such as smartphones, we set the content area to 375px and need to adjust the size of the images accordingly based on the set content area.
Why is the content area of the template 375px? I have introduced this issue in the previous tutorial, so I will not elaborate further. But it is important to remember that this size is an important standard, and the width dimensions of related components need to refer to this standard in the subsequent design process. After preparing the image materials for the model equipment, we create a corresponding master in Axure and drag the model equipment images into the master. The name of the master can be named after the device of that model, and when using it later, drag and drop the master into the newly created page.
The next step is to create the common elements or components in the APP interface introduced earlier. First, you can take a look at the template that has been created in this picture, which includes the model master, light prompts, pop ups, navigation bar, tab bar, content frame, and other elements.
在这个模板页面的概要视图中可以看到相关的对象,所有对象我都创建了一个对应的动态面板。这样的处理主要出于两个方面的考虑,一是方便对相关元素进行编辑维护,二是相关对象的显示是有顺序的,这样可以方便在概要视图中进行排序处理。
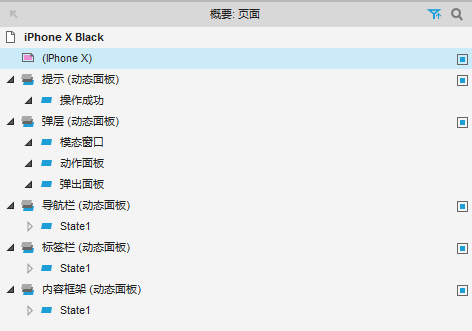
3.模板使用细节说明;
在内容框架中编辑界面内容;
界面的主要内容在内容框架动态面板中进行编辑和维护,由于该动态面板设置了自动显示滚动条,如果你的界面内容超出了一屏,在演示时可以通过在内容框架区域滚动鼠标滚轮查看更多内容。
关于模板界面元素的尺寸说明:
模板中的界面元素的尺寸并没有非常严格的标准,以下尺寸是我根据比例进行设置的,仅供参考。IphoneX状态栏:44px、IphoneX标签栏:80px、Iphone8状态栏:28px、IphoneX标签栏:60px、导航栏:40px。另外,内容区域的高度因为机型设备的素材图片不统一可能略有差异,基本上可以忽略。
每个界面对应一个页面;
在设计原型时建议每一个界面创建一个对应的页面,通过添加页面链接进行界面跳转,这样方便对原型进行编辑和维护。不建议将多个界面用动态面板堆砌在一起页面内,这样会使输出的原型在演示时出现卡顿现象。
关于元素的层级顺序;
在概要视图中可以看到相关元素对应动态面板的层级顺序,在使用该模板的时候请尽量参照此顺序,否则可能在演示时出现显示错误的情况。
关于底部标签栏的设置;
为了方便维护可以将标签栏创建为母版,然后添加到需要显示标签栏的页面中。另外,在对应的页面中需要显示对应的标签选中效果,只需要在该页面中的标签栏动态面板中添加一个选中效果的标签元件。
热区占位符的使用;
如果页面中添加了标签栏或工具栏,由于标签页的动态面板在内容框架的动态面板之上,在演示时会出现内容有一部分被挡住的情况。可以创建一个高度为100px的热区元件为母版,将母版拖入对应的页面底部,用来解决内容区域被挡住的问题。
4.常用设计元素及规范
经常有朋友向我咨询如何设计出更漂亮美观的原型,虽然原则上原型能完整的体现出需求细节即可,好看并不是我们在原型输出时应该关注的重点,但是如果能满足说明需求的同时能把原型做得更漂亮一些更好,这也算是体现专业程度和工作态度的一个方面,而且很多人对自己的输出物也是有强烈的美感追求的。
其实原型设计不需要了解太复杂的设计方法,只要掌握一点简单的技巧就能达到美观的效果,同时能让整体更统一和标准。在分享的这套模板中包含了一些基本的设计元素,我下面对其中的一些规范细节进行说明,供大家进行参考。
配色方案
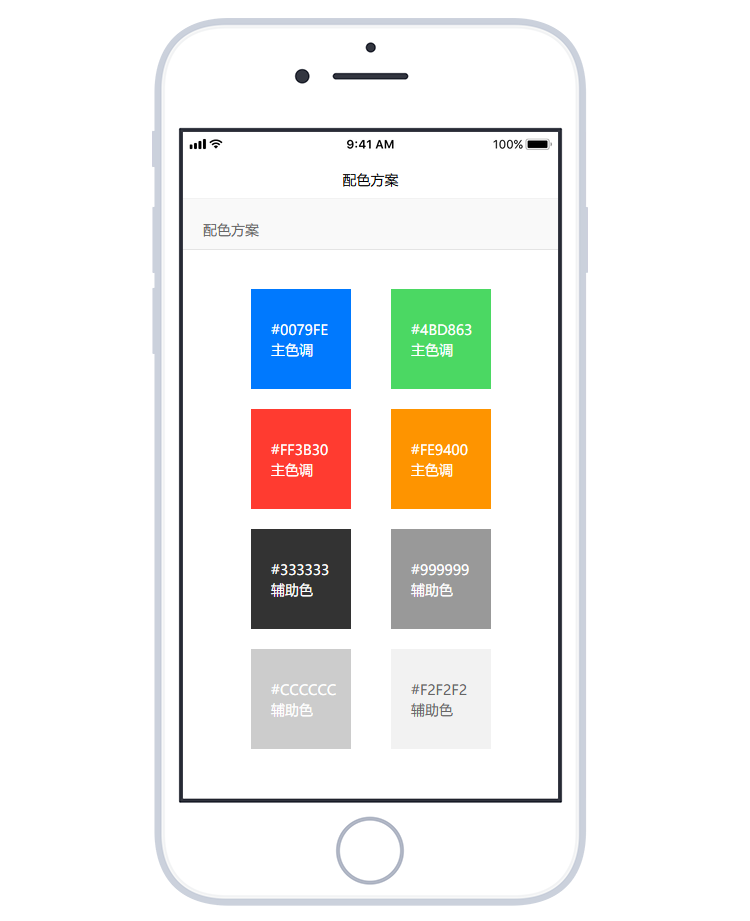
◆ 一般采用黑白灰的配色方案就能够满足基本设计要求了,但是如果能稍微得加上一些亮色的配色效果,可以使原型更好的体现出视觉层级,这对UI是有一定的参考价值的。不要感觉得配色效果能够影响UI的设计,如果UI会被原型中的配色影响,只能说明UI的设计能力有待提升;
整套原型中亮色主色调不要超过两个,对于主要按纽和重点提示可以加上主色调色值,次要元素统一使用#000000、#333333、#999999等灰色辅助色;
◆ 模板中的这套模板方案中的主色调是从IOS11的UI设计规范中提取的,你可以根据自己的需要整理一套自己的配色方案,建议尽量使用扁平化设计色值;
配色板使用
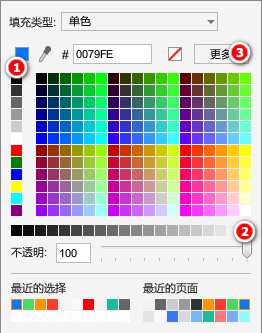
Axure中的配色板提供了一些常用的颜色色值,可用作一些常用元素的颜色配色。例如截图中标注1中的纵向的灰色色值可用于相关字体元素的颜色,标注2中横向的灰色色值可用于相关元素的背景和线条的颜色。另外,点击标注3中的更多按纽,可以将其它的常用色值加入到自定义颜色中,方便快速的使用。
字体元素
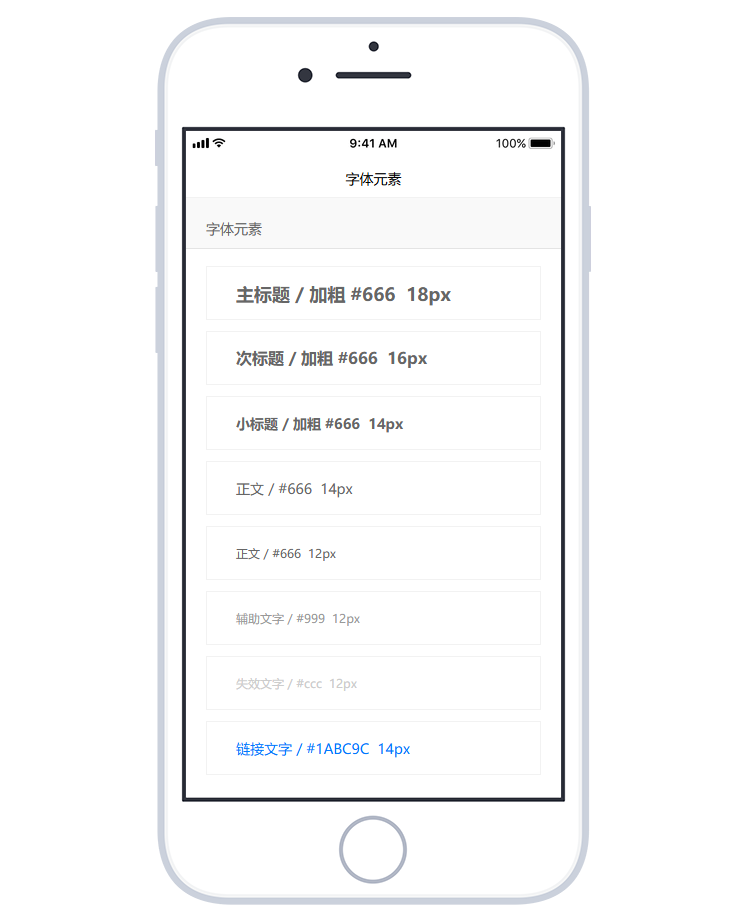
◆ 原型设计时的字体字号建议统一使用偶数,常用的标题字号为16px、18px、20px,常用的正文字号为12px、14px;
针对不同字体大小的多行文本单独设置对应的行间距,例如12px的多行文本行间距建议设置为20,14px的多行文本行间距建议设置为28;
推荐中文字体统一使用微软雅黑,由于Axure的默认字体为Arial,可以通过生成HTML设置中的字体映射,将Arial映射为微软雅黑,这样就不需要在设计时去单独设置每个元件的字体了。
其它元素
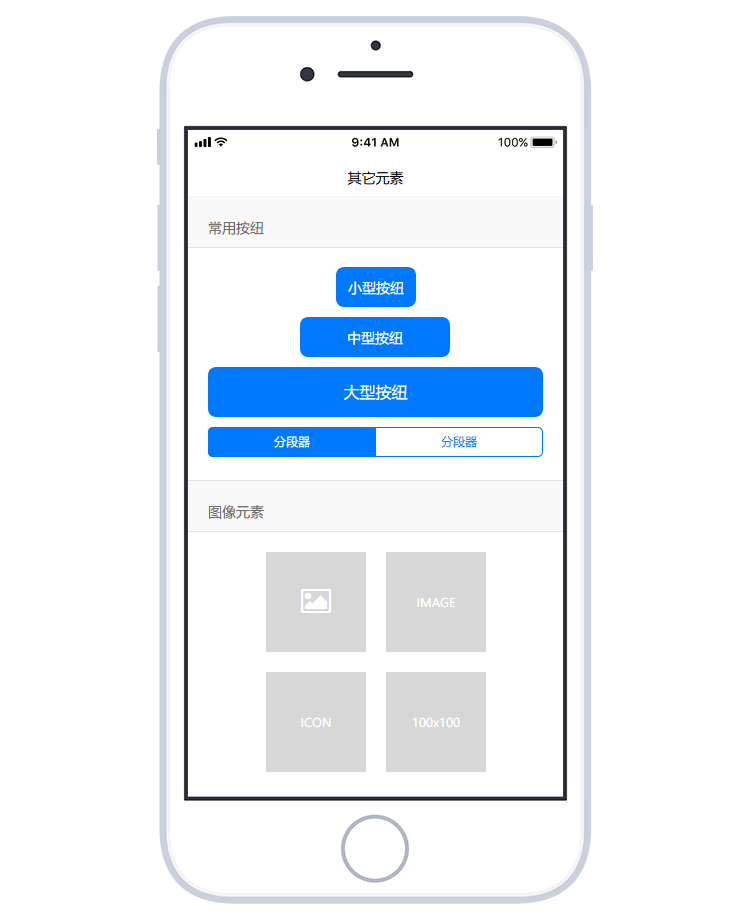
◆ 原型设计时元件的宽度建议统一保持为5和10的倍数,元件的间距建议为10px或20px;
◆ 使用键盘方向键移动选中的元件时每次移动距离为1px ,使用ctrl+键盘方向键每次移动距离为10px;
◆ 按住Ctrl+鼠标拖动可以快速的复制元件,按住Shift+鼠标拖动可以垂直或水平的移动元件;
对齐及分布工具使用

有对齐强迫症的朋友可以使用顶部工具栏中的对齐及分布工具对元件进行处理,右击顶部的工具栏区◆ 域可以自定义显示或隐藏相关的工具图标;
选中多个元件时可以使用对齐工具快速的对多个元件进行各种对齐处理,还可以使用分布工具快速的对多个元件进行垂直或水平分布处理;
5.使用辅助线进行排版;
在以前的教程中已经介绍过辅助线的使用方法,合理的使用辅助线可以帮助我们提升设计效率,同时能让输出的原型效果更标准,所以强烈建议大家在设计过程中使用。以下是模板中内容框架编辑区域的截图,是我常用使用辅助线用来排版的方式。截图中的辅助线均为横向x轴辅助线,可以看到其中共有4条,分别介绍一下它们的作用和位置:
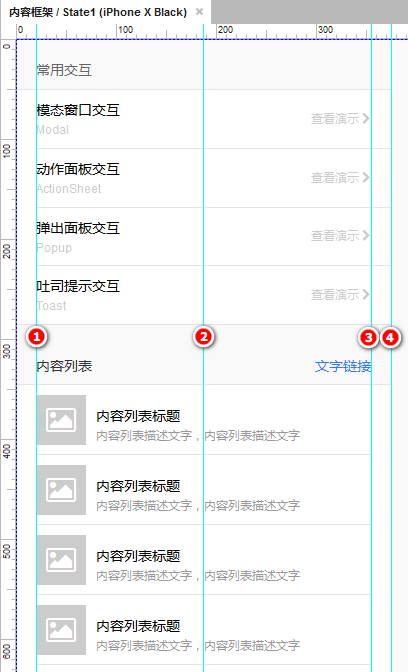
第1条辅助线是用来划分左边的内容留白区域,例如我一般习惯将左边留白为20px,这条辅助线位于x轴的20px位置。
第2条辅助线是内容居中辅助线,之前已经介绍过模板的设计宽度标准为375px,这条辅助线位于x轴的188px位置;(375px/2=187.5px)
第3条辅助线用来划分右边的内容留白区域,例如右边跟左边留白一样为20px,这条辅助线位于x轴的355px位置;(375px-20px=355px)
第4条辅助线是用来划分内容设计区域,例如模板的设计宽度标准为375px,这条辅助线位于位于x轴的375px位置;
这些辅助线的用法只是作为参考,可以根据自己的需要新建对应的辅助线。鼠标光标移动到编辑区域的左侧和顶部的标尺区域,按住鼠标左键并往编辑区域拖动时,就可以生成横向x轴或纵向y轴的辅助线,然后将辅助线拖动到对应的位置即可。辅助线还有一个特性就是当拖动元件靠近它时,元件会自动吸附到辅助线的边缘达到快速对齐的效果。
几点辅助线的使用小技巧:
右击辅助线可以将其锁定,以防止拖动元件时会将辅助线会跟着一起移动;
可以通过按住Ctrl拖动创建全局辅助线,全局辅助线就是在所有页面中产生一条相同的辅助线;
在“布局—栅格和辅助线—锁定辅助线”中选中可以将所有的辅助线保持锁定状态且无法删除;
在“布局—栅格和辅助线—删除辅助线”中可以清除所有页面中的辅助线;
在“布局—栅格和辅助线—辅助线设置”中可以修改辅助线的颜色或进行更多设置;
6.Toast提示交互设置;
移动端原型中最常用的交互效果就是弹出层和轻提示两种,模板中已经包含了这种两交互效果的相关元件和事件,这里再单独简单的介绍一下。
Toast提示显示效果

在模板页面的概要视图中可以看到名为“提示”的动态面板,需要显示的提示信息在这个动态面板中编辑就可以了。当前的动态面板中有一个“操作成功”的提示状态,如果在一个页面中显示多个提示,可以新增对应的状态然后修改相关的提示内容。
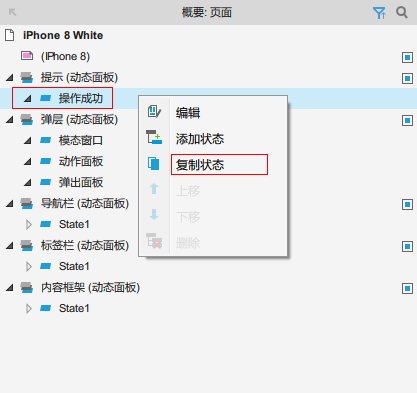
选中提示的动态面板的状态右击选择复制状态可以快速创建新的提示。建议对每个对应的提示状态进行命名,这样方便后续进行管理。关于轻提示的基本使用规范请参照前面的介绍内容。
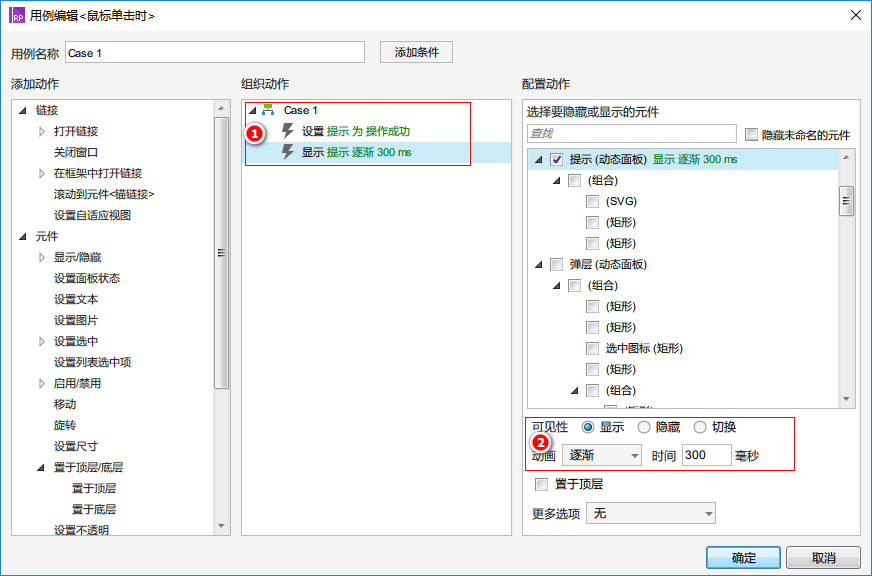
Toast提示的显示方式设置很简单,只需要在对应的元件事件上加入以上的交互动作。首先设置提示动态面板中对应的状态,然后设置显示动态面板,显示时有一个逐渐的动画效果。
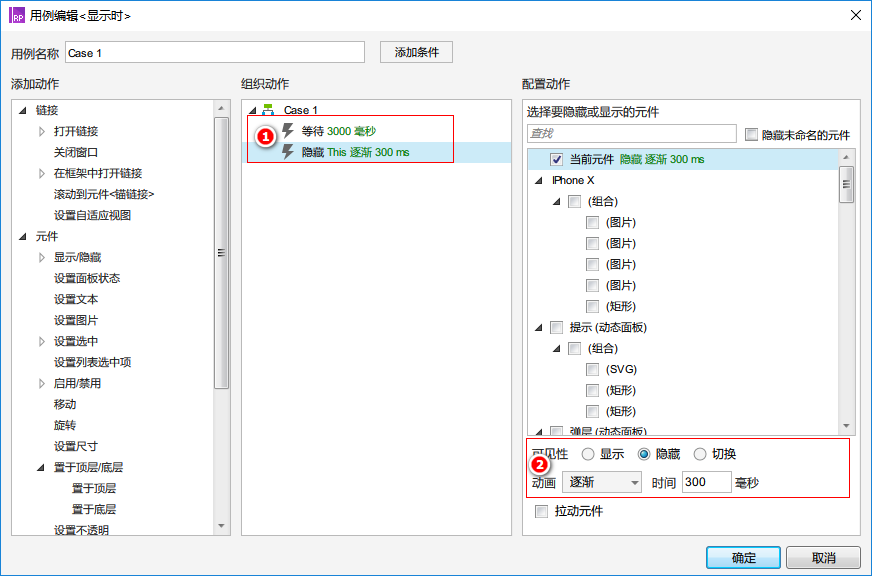
Toast提示显示以后会在3秒后自动逐渐隐藏,模板中的这个交互动作已经加在提示动态面板的显示时事件中了,不需要再单独的进行设置。
7.常用弹层交互设置
模态窗口交互效果
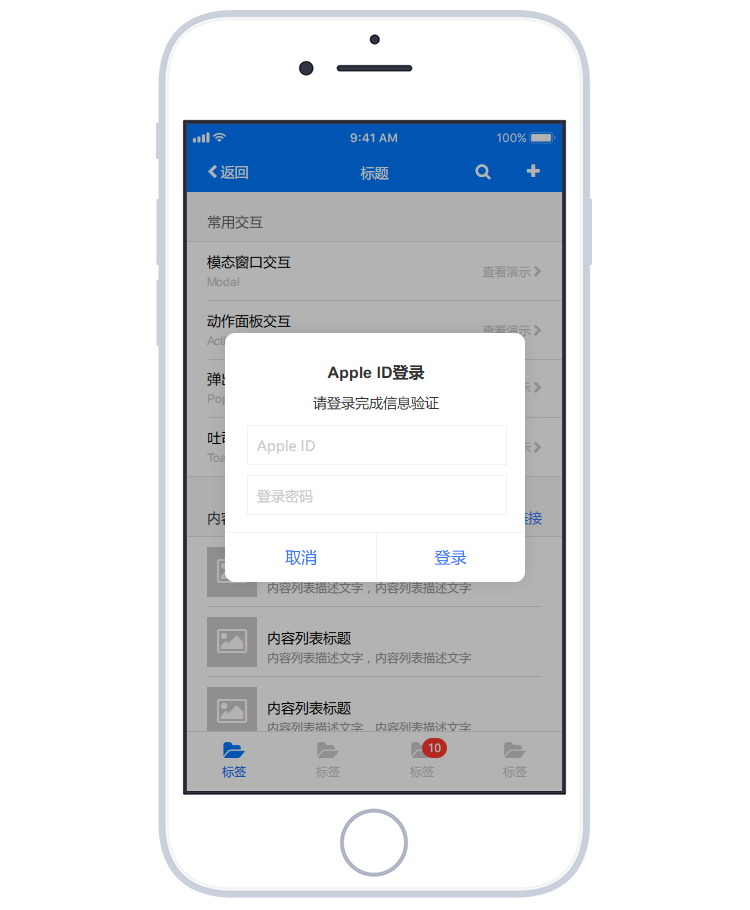
移动端的弹层共分为模态窗口、动作面板、弹出面板等几种不同的类型。在模板页面的概要视图中可以看到名为“弹层”的动态面板,可以根据需要创建更多其它的弹层状态,还能在对应的面板状态属性中设置透明背景的遮罩效果。
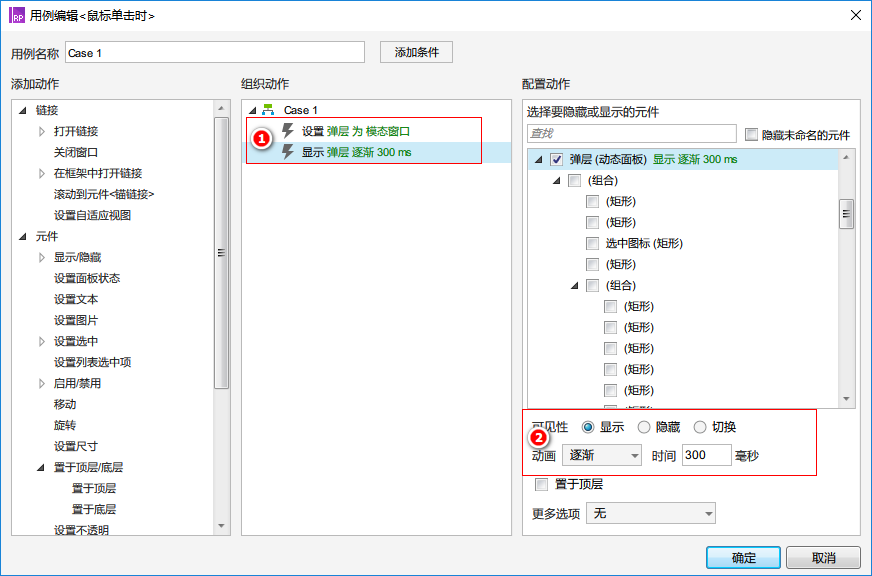
上面截图中的为比较常见的模态窗口弹层效果,设置方式是在对应的元件事件上加入以上的交互动作。另外,根据模态窗口、动作面板、弹出面板这几种弹层类型的弹出方式不同,需要设置显示时为向上滑动和逐步等动画效果。
8.导航栏切换交互设置
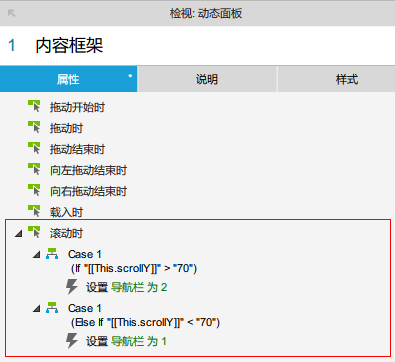
最后介绍一下如何实现内容区域滚动时,导航栏自动切换的交互效果。首先需要在导航栏的动态面板中创建对应的状态,然后选中内容框架动态面板,在它的滚动时事件中按照上面的格式加入对应的条件判断即可。
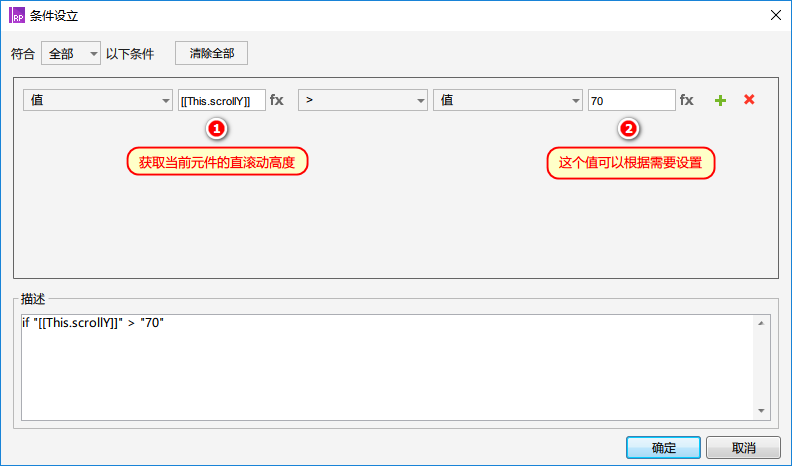
在这个设置用到了条件判断和函数,条件的详细设置见上方的截图。它的原理是当内容框架垂直滚动高度大于70时设置导航栏动态面板的显示状态为2,当内容框架垂直滚动高度大小于70设置导航栏动态面板的显示状态为1。其中用到的This.scrollY函数是获取当前元件的直滚动高度,70的值可以根据需要自己设置。
好了,到此这篇基于设备模板的移动端原型设计方法的分享基本介绍完了。最后提供的是iPhoneX And iPhone8 Mockup 原型模板的源文件下载,大家可以结合本文中的相关介绍进行使用。
Copyright
Article Source: https://www.axuretheme.com/libraries/14.html


